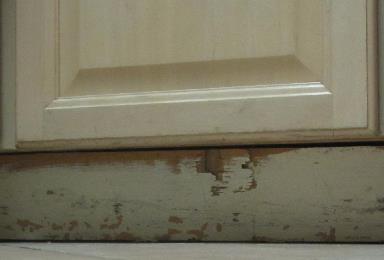
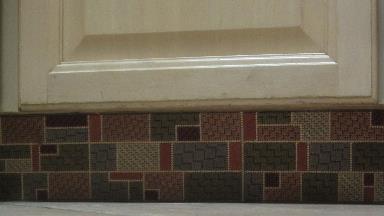

My kitchen recently reached its 17th birthday, and some parts are not aging gracefully. The cabinet base molding (also known as toe kick board) is awfully scratched. I decided to needlepoint new moldings for under the kitchen cabinets. I chose earth tones that match the cabinets and colors that would not look dirty if they get soiled. They are DMC 451, 840, 407, 613, 315, and 922. I used 951 for the “grout” between the tiles. Some math helped me figure out dimensions and pattern. I stitched up my design on Darice 10 mesh plastic canvas.
I began a year ago with a small area, and my friends laughed at me. “The next thing you’ll stitch are the kitchen floor tiles themselves!” exclaimed Sarah R. Another was horrified and could not understand how I would keep them clean. My motivation deflated. But the cracked peeling moldings kept urging me to persevere, so I revisited the project. The moldings get stitched one panel at a time, so I stitched on the subway, while waiting on long lines at Marshalls and Burlington Coat Factory, and other similar opportunities. When I completed a segment, I attached it to the existing molding using a glue gun.
Suddenly my kitchen is gorgeous! I still have a few more areas to complete, but I love, love, love the results. When I’m entirely done, I’ll post more photos. And I can’t wait to watch my friends drool the next time they visit.
Enjoy the creativity!
LOVE this!
I love them. what a great idea and if one gets too stained you can always stitch another one.
Beautiful….love it and anxious to see finished pics. You Go Girl!
A suggestion: Put your needlepoint in place using 3M Command “velcro” picture hangers. This way when they get dirty just peel them off, wash, dry, and replace! And also coat them with 3M waterproofing spray. This helps prevent dirt and water from affecting them in the first place! You have a really neat idea!