On the Scottish Diamond Stitch

The Scottish Diamond stitch is a medium-complexity stitch that is good for filling larger areas with an elegant, symmetrical pattern. I’ve created a diagram that illustrates the stitch below.
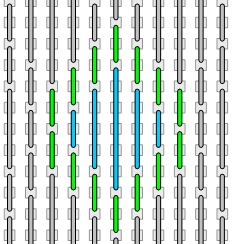
Diagram of the Scottish Diamond Stitch

The Scottish Diamond stitch appears in Lucinda Ganderton’s “Stitch Sampler” on page 123 (I am using the edition from 1999, but it is still on that page in the most current print). Here is what she writes:

Start at top left. Work five upright stitches in a diamond shape…Repeat to the end of the line leaving one space between each diamond (emphasis mine).

Following Lucinda’s instructions, your diamonds will be tightly wrapped with a series of vertical stitches, but they won’t criss-cross as you might expect.

Here are some illustrations to show you what I mean. Lucinda’s stitch can be diagrammed as follows: 

Scottish Diamond over a larger area

But if you desire a more symmetrical look, where the wrapping stitches criss-cross nicely, the stitch would look like this:
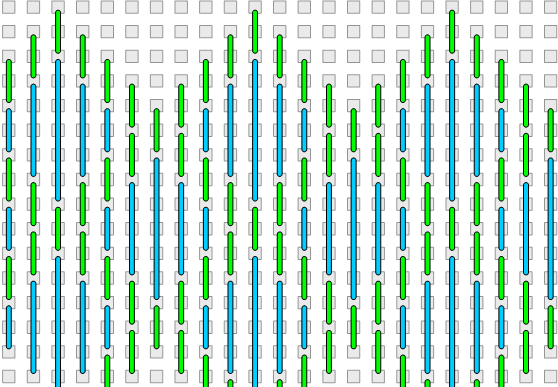
Scottish Diamond Criss Cross

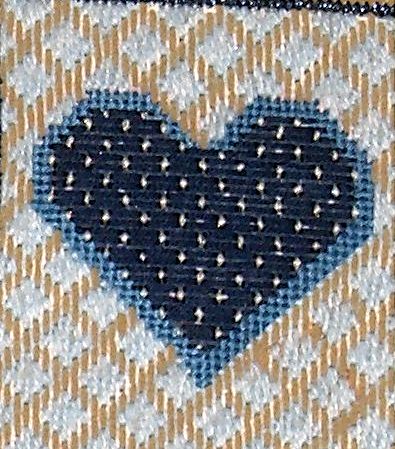
We can call this variant the “Scottish Diamond Criss Cross”. (For all I know, there already is a stitch out there with this pattern, I just don’t know of it. Does anybody out there know?) Here is a photo detail of the stitch using my variation, from Pepita’s Baby Boy Sampler:


Scottish Diamond Criss-Cross Stitch Example

Instead of leaving 1 space between the diamonds, as per Lucinda’s instructions, you need to leave 3 spaces between each diamond. Otherwise, the outlining stitch that wraps each diamond will not criss-cross properly. If you study the photo detail I put in before, you’ll see what I mean.

Incidentally, I very much recommend Lucinda’s book – her work is excellent and it is a valuable reference for every needlepointer.

P.S. Be sure to check out my tip for looking up stitches in Lucinda’s book on Amazon.

New Article: Tutorial for Needlepoint Beginners

girl needlepointing


This is a little late, but I’ve posted a new article at Pepita Resources for beginners, called The Needlepoint Beginner: How Do I Start Stitching? This is a tutorial-style piece aimed at people who have never needlepointed but would like to learn. Many beginners are overwhelmed at the notion of trying something totally new and do not know how to start. If you are that person, this article is for you. Excerpt:


You saw someone doing it on a park bench in the blissful spring air. You remember your mother stitch-stitch-stitching, while on the phone, or in the doctor’s waiting room. Yesterday, your friend proudly showed off her latest masterpiece, framed neatly on the kitchen wall. Whatever it is, you want some too! How does a complete beginner start needlepointing?


Presenting our Needlepointing Tutorial for Beginners. Read on and see how easy it is to take up needlepointing. Introduce yourself to one of the most relaxing and rewarding hobbies that’s been around for hundreds of years.


Go on and read the whole thing. Let me know what you think in the comments.

Needlepoint Appreciation


Your old needlepoint you inherited from your grandmother’s grandmother might be worth more than you think. See this story covering the Antiques Roadshow, where Doris Black was pleasantly surprised to learn that her great-great-great aunt’s needlepoint masterpiece would fetch $2,000 to $2,500.


A great-great-great aunt would have lived about 100 years ago, when goods such as needlepoint canvas and thread costed far less than what they cost today. A canvas such as hers plus thread would cost in today’s dollars about $350 total. In 1900, this would have been about $15 (try it out yourself using this inflation calculator).


So, assuming inflation continues along a similar path for the next hundred years, your great-great-great niece may wind up selling your own stitched project for over $8,000. Now that’s what I call needlepoint appreciation.

Quickly Looking Up Needlepoint Stitches

Here’s an interesting tip, that I am sharing here for you to use responsibly (in other words, please don’t abuse this little trick, and respect authors’ copyrights).

Say you are looking for details on a needlepoint stitch. For example, you wanted to look up the Lucinda Ganderton’s “Stitch Sampler” entry on the Scottish Diamond stitch, but you didn’t have the book with you. Proceed to Amazon’s listing of the book and hover your mouse over the image, where it says “Look Inside”. A little popup will offer a textbox where you can enter the words “Scottish Diamond”. On the search results page, you can click on page 123 to get a scan of the page you are looking for.

My Very First Entry!

Congratulations to us at Pepita on our very first blog entry!


Why set up a blog, you ask? The purpose of this blog is manifold:


  • Photos of needlepoint work. When a proud customer shows us a completed needleart work, we ask permission to post a photo here on the blog. This is a great way to share your creative techniques with other people so everyone can benefit. Comments from our readers discussing the piece will make for very interesting reading as well. Do you have a needlepoint work you’d like to share? Send it to us! Use the email link on the side of the page to let us know about it.
  • Communication. It’s a great way to share our thoughts with customers and partners, and have them comment right back at us. Communication is key to any business, and critically so to a creativity-based business such as ours. Do you have a suggestion for improving our website? Our products? Anything? Let us know!
  • Stitch Guides. Many customers ask for stitch guides to help them complete a needlepoint piece. We can use this blog to publish different needlepoint stitches and techniques. Over time, a wealth of needlepoint-related resources will accumulate here for the benefit of the entire online needlepoint community.

Here’s to a long and healthy blogging future!